| 일 | 월 | 화 | 수 | 목 | 금 | 토 |
|---|---|---|---|---|---|---|
| 1 | 2 | 3 | 4 | 5 | 6 | 7 |
| 8 | 9 | 10 | 11 | 12 | 13 | 14 |
| 15 | 16 | 17 | 18 | 19 | 20 | 21 |
| 22 | 23 | 24 | 25 | 26 | 27 | 28 |
- AWS
- 모작
- 유니티 UI
- OVR
- meta xr
- CGV
- 아마존
- Oculus
- 드래곤 플라이트 모작
- 가상현실
- 길건너 친구들
- 유니티
- 연습
- 멀티플레이
- 드래곤 플라이트
- 개발일지
- Unity
- 팀프로젝트
- 유니티 GUI
- meta
- 개발
- 오큘러스
- 오브젝트 풀링
- ChatGPT
- 유니티 Json 데이터 연동
- VR
- Amazon S3
- 팀 프로젝트
- Photon Fusion
- 포트폴리오
- Today
- Total
EasyCastleUNITY
OVR Unity Locomotion 탐구 (텔레포트 기능) 본문
https://developer.oculus.com/documentation/unity/unity-isdk-create-locomotion-interactions/
Create Locomotion Interactions | Oculus Developers
developer.oculus.com
이 글은 위 링크의 문서를 바탕으로 만들고 작성했으며, Oculus Integration SDK 57.0버전을 기준으로 작성되었습니다. 참고하여 주시기 바랍니다.
# 주의사항: 이번 문서는 구현하는데 필요한 절차가 문서에 모두 설명되어 있지 않습니다, 그래서 추가로 필요한 구현요소도 같이 설명할 생각이니 이 점 참고해주시기 바랍니다.
Create Locomotion Interactions
hands, controllers as hands, controllers를 사용하여 순간이동을 하거나 스냅 회전을 하려면 LocomotionHandInteractorGroup 프리팹에 포함된 locomotion interactions를 사용합니다.
locomotion interactions를 시도해보려면, LocomotionExamples 씬을 실행해 보세요
Add Locomotion Interactors
Locomotion interactors를 사용하면 locomotion interactions 가능 객체 또는 순간 이동을 허용하는 씬의 다른 영역으로 순간 이동을 할 수 있습니다.
Adding Locomotion Interactors for Hands
1. hands가 세팅되어 있는 씬을 엽니다.
2. 프로젝트에서 LocomotionHandInteractorGroup 을 검색하여 나온 결과인 LocomotionHandInteractorGroup 프리팹을 OVRInteraction > OVRHands > LeftHand > HandInteractorsLeft 의 자식으로 만들어줍니다. 이 프리팹은 이동이 즉시 작동하는데 필요한 모든 구성요소가 포함되어 있습니다.
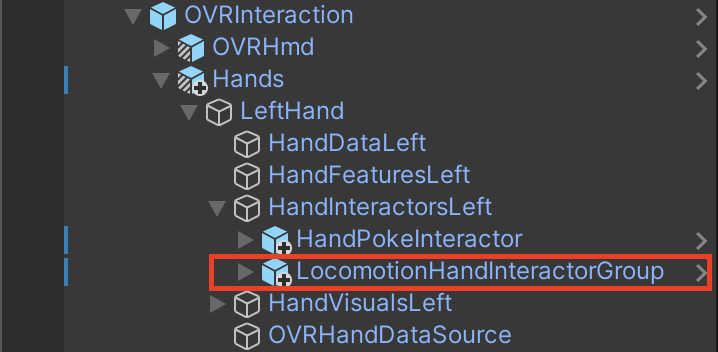
3. Hierarchy 에서, LocomotionHandInteractorGroup 을 선택합니다.
4. 인스펙터에서 Hmd Ref 컴포넌트의 Hmd의 OVRHmd를 세팅합니다.

5. 인스펙터에서 Active State Finger Visual 컴포넌트를 Add Component를 통해 추가해줍니다.

6. 추가한 Active State Finger Visual 컴포넌트에서, Hand Material Property Block Editor 속성에
HandVisualsLeft > OVRLeftHandVisual > OculusHand_L 의 아래에 있는 l_HandMeshNode 를 세팅합니다.


7. Active State 속성에 LocomotionHandInteractorGroup 을 세팅하고, Finger Mask는 Middle과 Ring 2개를 선택합니다.

8. HandFeaturesLeft를 선택합니다.
9. 인스펙터에서 , Finger Feature State Provider 컴포넌트 를 추가합니다.
10. Finger Feature State Provider 컴포넌트에서 아래 사진과 같이 세팅해줍니다.
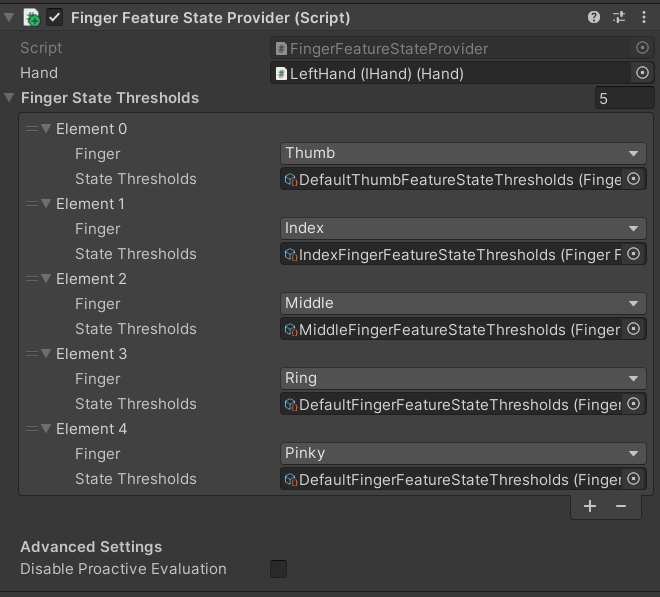
10-1. State Thresholds는 아래 사진의 위치에 있습니다.

Thumb는 DefaultThumbFeatureStateThresholds, Index는 IndexFingerFeatureStateThresholds,
Middle은 MiddleFingerFeatureStateThresholds를 사용하고, 나머지 2개, Ring과 Pinky는 DefaultFingerFeatureStateThresholds를 사용합니다.
11. Hierarchy 에서, LocomotionHandInteractorGroup 을 선택합니다.
12. 인스펙터에서, Finger Feature State Provider Ref의 Finger Feature State Provider 속성에 HandFeaturesLeft를 세팅합니다.
13. OVRInteraction의 자식으로 Locomotion이라는 이름의 빈 오브젝트를 만듭니다.
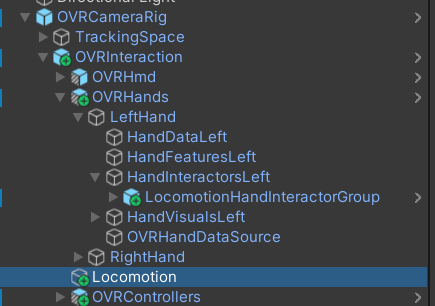
14. Locomotion을 선택합니다.
15. 인스펙터에서, Add Component를 누르고, Player Locomotor라는 컴포넌트를 찾아 부착합니다.

16. Player Locomotor 컴포넌트의 Player Origin 속성에는 OVRCameraRig를 Player Head 속성에는 CenterEyeAnchor를 세팅합니다.


17. Hierarchy 에서, LocomotionHandInteractorGroup 을 선택합니다.
18. 인스펙터에서 Locomotion Events Connection 컴포넌트의 Handler 속성에 방금 만든 Locomotion을 세팅합니다.
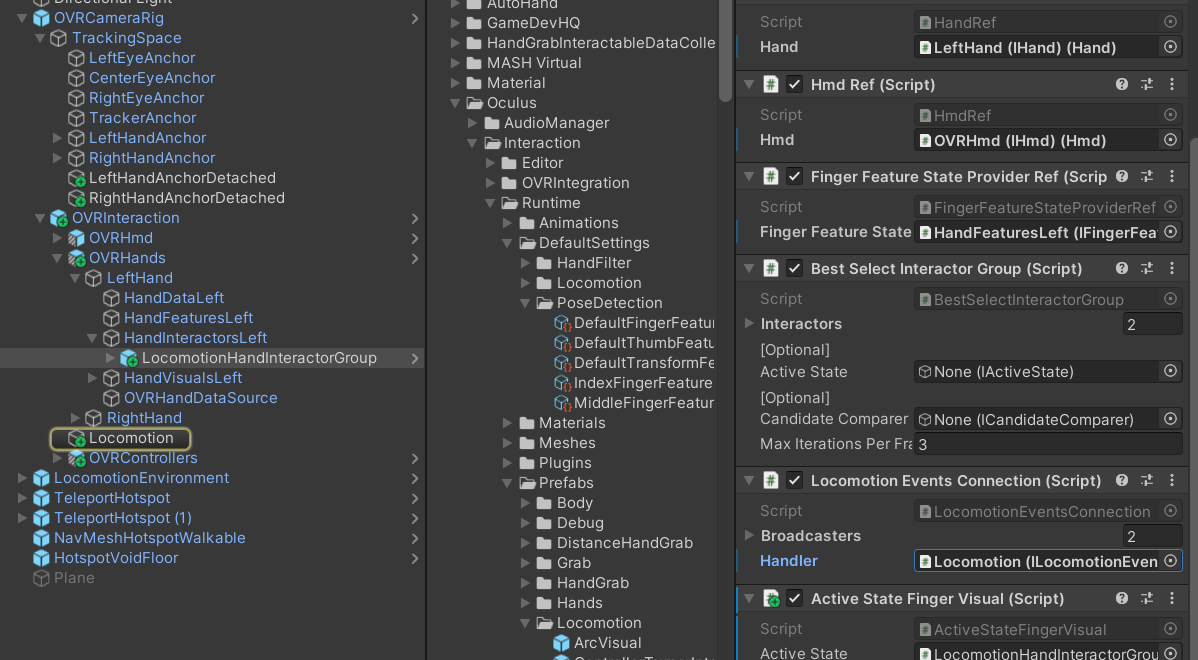
19. 인스펙터에서 Add Component를 이용하여 Interacotr Active State 컴포넌트를 추가합니다.
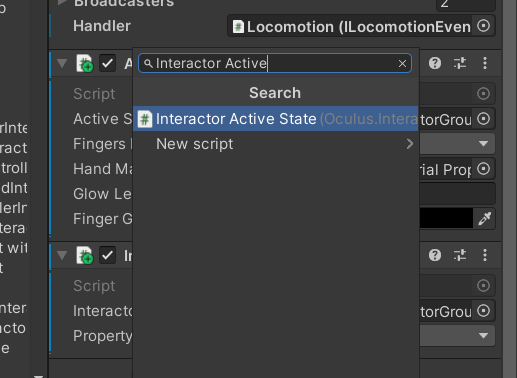
20. 아래 사진처럼 세팅해줍니다.

Interactor 속성에는 자기 자신(LocomotionHandInteractorGroup)을 세팅해줍니다.
21. 위 과정을 오른손에도 반복합니다.
Adding Locomotion Interactors for Controllers
1. controllers가 세팅되어 있는 씬을 엽니다.
2. OVRInteraciton의 아래에 자식으로 Locomotion 이라는 이름의 빈 오브젝트를 만듭니다.
3. Locomotion을 선택합니다.
4. 인스펙터에서, Add Component를 누르고, Player Locomotor라는 컴포넌트를 찾아 부착합니다

5. Player Locomotor 컴포넌트의 Player Origin 속성에는 OVRCameraRig를 Player Head 속성에는 CenterEyeAnchor를 세팅합니다.

6. 프로젝트에서, LocomotionControllerInteractorGroup 을 검색하여 나온 결과인 LocomotionControllerInteractorGroup 프리팹을 OVRInteraction > OVRControllers > LeftController > ControllerInteractors 에 자식으로 만듭니다. 이 프리팹은 이동이 즉시 작동하는데 필요한 모든 구성요소가 포함되어 있습니다.
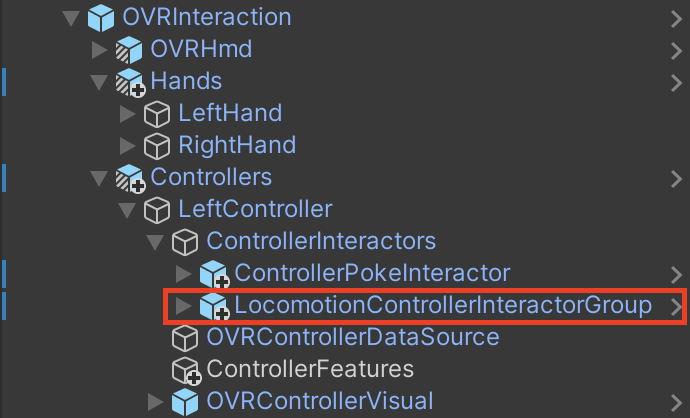
7. Hierarchy 에서 LocomotionControllerInteractorGroup 을 선택합니다.
8. 인스펙터의, Hmd Ref 컴포넌트에서, Hmd 속성에 OVRHmd를 세팅합니다.
9. Locomotion Events Connection 컴포넌트에서, Handler 속성의 위에서 만든 Locomotion을 세팅합니다.
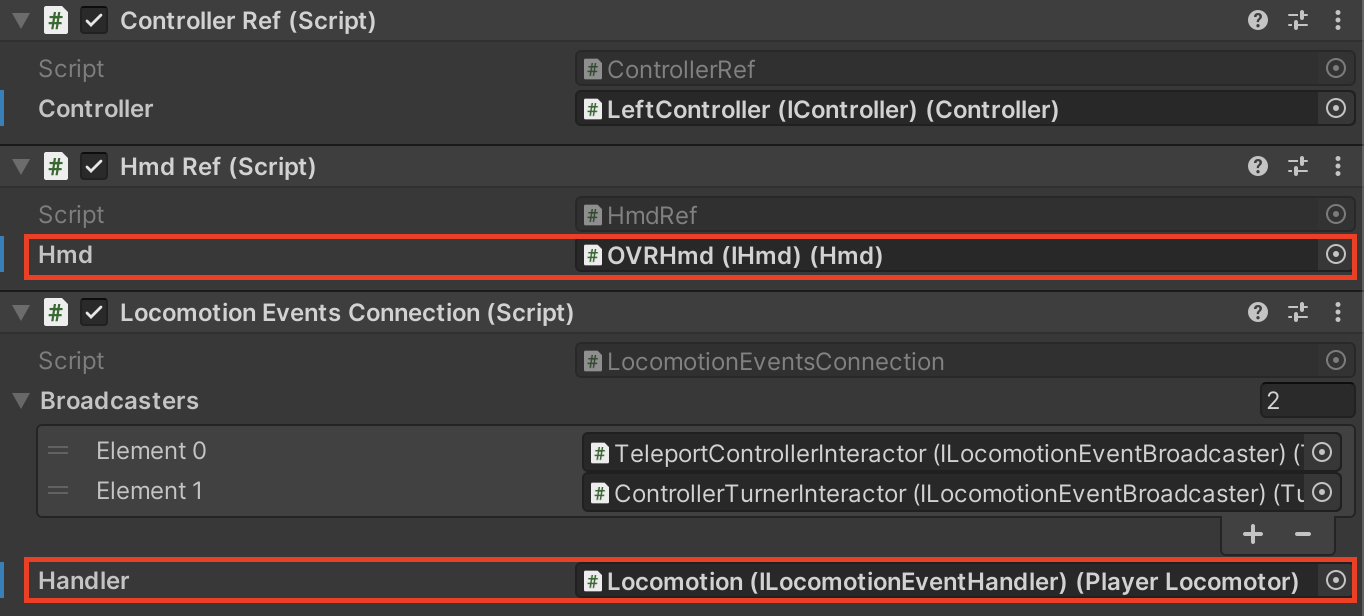
10. Hierarchy 에서 LeftController 아래의 ControllerFeatures 라는 이름의 빈 오브젝트를 만듭니다.

11. 인스펙터에서 OVR Axis 2D 컴포넌트를 추가합니다.
12. Controller 속성을 LTouch, LHand 2개를 세팅합니다.
13. Axis 2D 속성에 Primary Thumbstick, Primary Touchpad 를 세팅합니다.

14. Hierarchy 에서 LocomotionControllerInteractorGroup > TeleportControllerInteractor > TeleportActiveState > Activate 를 선택합니다.

15. 인스펙터의 Axis 2D Active State 컴포넌트의 Input Axis 속성의 ControllerFeatures를 세팅합니다.

16. Hierarchy 에서 Active와 같은 계층에 있는 Deactive를 선택합니다.
17. 인스펙터의 Axis 2D Active State 컴포넌트의 Input Axis 속성의 ControllerFeatures를 세팅합니다.
18. Hierarchy 에서 LocomotionControllerInteractorGroup > TeleportControllerInteractor > Selector 를 선택합니다.
19. 인스펙터의 Axis 2D Active State 컴포넌트의 Input Axis 속성의 ControllerFeatures를 세팅합니다.
20. Hierarchy 에서 LocomotionControllerInteractorGroup > ControllerTurnerInteractor 을 선택합니다.
21. 인스펙터의 Locomotion Axis Turner Interactor 컴포넌트에서 Axis 2D 속성에 ControllerFeatures 를 세팅합니다.

22. 위 과정을 오른쪽 컨트롤러에도 반복해주세요.
Add Locomotion Interactable
Teleport Interactor를 구성한 후에는 텔레포트할 지점을 추가해야 합니다.
1. 프로젝트에서 TeleportHotspot 을 검색하여 나온 결과인 TeleportHotspot 프리팹을 Hierarchy 에 드래그 앤 드롭합니다.
2. Scene 뷰의 Transform 기즈모를 이용하여 이 프리팹을 여러분이 텔레포트 하기 원하는 지점에 위치시킵니다.
| 주의점 여러분은 또한 사용자가 해당 지역 내 어디든 순간 이동 할 수 있도록 순간이동 가능한 영역과 영역 범위 밖을 정의 할 수 도 있습니다. 이렇게 하려면 LocomotionExamples 장면의 NavMeshHotspotWalkable 및 HotspotVoidFloor를 장면에 복사합니다. |
3. File > Build And Run 을 선택하거나, Oculus Link가 연결되어 있다면 Play 버튼을 클릭하세요.
현재 씬이 로드되면 손으로 L자 모양을 만들거나 컨트롤러의 조이스틱을 앞으로 누릅니다. 손이나 컨트롤러에서 흰색 광선이 방출됩니다. TeleportHotSpot또는 순간 이동 가능한 영역 위로 마우스를 가져간 후 엄지와 검지를 맞닺게 하거나(손을 사용하는 경우) 조이스틱을 놓으면, (컨틀로러를 사용하는 경우) 해당 위치로 순간이동합니다.
직접 만들어본 Locomotion 영상입니다.
'Oculus VR 탐구' 카테고리의 다른 글
| OVR Haptics Studio 탐구 (1) | 2023.11.14 |
|---|---|
| OVR Haptic Feedback 탐구 (1) | 2023.11.14 |
| OVR 유니티 Poke Interactions 탐구 (0) | 2023.10.31 |
| OVR 유니티 기본 Ray Interactions 만들기 탐구 (0) | 2023.10.27 |
| OVR Grabbable 컴포넌트 탐구 (0) | 2023.10.26 |
